
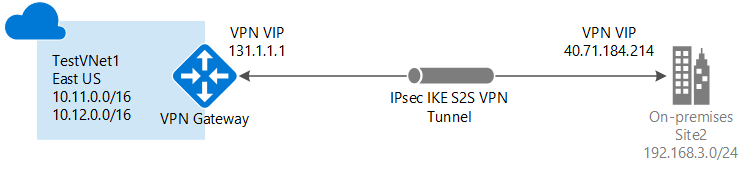
A Site-to-Site VPN is a secure connection between your on-premises network and your Azure virtual network. This allows you to extend your on-premises network to Azure, providing secure communication between your local network and resources in the cloud.
Step 1: Prerequisites
Before setting up the Site-to-Site VPN in Azure, ensure you have the following prerequisites in place:
- Azure Subscription: You’ll need an active Azure subscription. If you don’t have one, you can sign up for a free trial.
- On-Premises Network: You should have an on-premises network with a compatible VPN device (e.g., VPN router or firewall).
- Static Public IP Address: Your on-premises VPN device should have a static public IP address or a domain name to ensure a stable connection.
- Azure Virtual Network: Create an Azure Virtual Network (VNet) if you haven’t already. Note down the VNet’s address space and subnet configuration.
Step 2: Create Virtual Network Gateway in Azure
- In the Azure Portal, navigate to “Create a resource” > “Networking” > “Virtual network gateway.”
- Configure the Virtual Network Gateway with the following settings:
- Name: Choose a name for your gateway.
- Region: Select the Azure region closest to your on-premises location.
- Gateway type: Select “VPN.”
- VPN type: Choose the appropriate VPN type for your device.
- SKU: Choose the gateway SKU based on your network requirements (e.g., Basic, VpnGw1, etc.).
- Virtual network: Select the VNet you created earlier.
- Public IP address: Create a new IP address or use an existing one.
- Click “Review + create” and then “Create” to provision the Virtual Network Gateway.
Step 3: Configure On-Premises VPN Device
You will need to configure your on-premises VPN device to establish a connection with Azure. The exact configuration steps will depend on your device and its manufacturer. Consult your device’s documentation or vendor support for guidance.
Key configuration details to set on your on-premises VPN device include:
- Public IP Address or DNS Name of the Azure Virtual Network Gateway.
- Pre-shared key for authentication.
- The IP address range for the Azure VNet.
Step 4: Create Local Network Gateway in Azure
- In the Azure Portal, navigate to “Create a resource” > “Networking” > “Local network gateway.”
- Configure the Local Network Gateway with the following settings:
- Name: Choose a name for your local network gateway.
- IP address: Specify the public IP address or DNS name of your on-premises VPN device.
- Address space: Define the on-premises network address space.
- Click “Review + create” and then “Create” to provision the Local Network Gateway.
Step 5: Create Connection
- In the Azure Portal, navigate to the Virtual Network Gateway created in Step 2.
- Go to the “Connections” tab and click “Add” to create a new connection.
- Configure the connection with the following settings:
- Name: Choose a name for the connection.
- Connection type: Select “Site-to-Site (IPsec).”
- Local network gateway: Choose the local network gateway created in Step 4.
- Shared key: Define a pre-shared key for authentication.
- Click “Review + create” and then “Create” to establish the connection.
Step 6: Verify and Test the Connection
After creating the connection, Azure will start the process of connecting your on-premises network to your Azure Virtual Network. You can monitor the connection status in the Azure Portal.
Once the connection is established, test the Site-to-Site VPN to ensure it’s working correctly. You should be able to access resources in your Azure Virtual Network from your on-premises network and vice versa.