
An Introduction of Azure Sentinel
Microsoft Sentinel is a solution for a variety of issues including intelligence analysis, detecting uncovered threats, investigating suspicious activity, enterprising monitoring, and rapid response. Sentinel is a Security Information and Event Management (SIEM) and Security Orchestration, Automation, and Response (SOAR) service in the cloud.
Today, I will discuss Azure Sentinel’s benefits, how it differs from Microsoft Defender for Cloud (formerly Azure Security Center), how to use it to trigger an alert when a malicious incident has occurred, and forward the notification to a specific Microsoft Teams channel.
Understanding the Risk
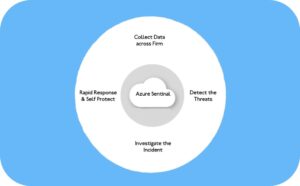
Today’s organizations are moving toward multi-clouds like GCP, AWS, Azure, and On-Premesis. People currently work outside the company network, using unknown websites and suspicious devices. This leaves your organization vulnerable to attacks by hackers. Your priority should be protecting your investment by collecting data, detecting threats, investigating threats, and responding to the threat accordingly. Therefore, you need a security manager that can keep eye on everything. This is where Azure Sentinel can step in.
The Difference Between Azure Sentinel & Microsoft Defender for Cloud
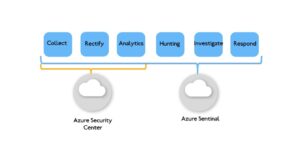
Both Azure Sentinel and Microsoft Defender for Cloud are offered by Microsoft. However, Microsoft Defender for Cloud mainly focuses on detecting security issues, generating alerts, misconfiguration, and lack of permission. These alerts would be further utilized by Azure Sentinel to investigate and respond accordingly.
To begin your Azure subscription, you’ll first need to create a free account here.
You will also need to familiarize yourself with some definitions before proceeding, such as:
- Resource Group – a container that contains related resources for an Azure solution.
- Log Analytics workspaces – used to store logs and data from Azure.
- Storage accounts – used to share data and logs generated from Log Analytics.
- Permission– Contributor or reader permissions on the resource group.
How to Set Up Sentinel for a Storage Account
Follow these six steps to set up Azure Sentinel in a storage account.
1. Create a Resource Group
First, login to Azure portal and search “Resource group” in the search bar. Then, select “create.”
Next, enter the following in these three values:
- In subscription, select “Free Trial.”
- Resource group: I created a resource group called “rahulresource” as an example. You can create your own name based on your Project name.
- Region: I have selected “(US) East US.”
Then, select “Review + create.”
2. Create a Workspace:
Search for “Log Analytics Workspace” and select “create.” Then, choose “subscription” and select the existing resource group. Provide a name to the new log analytics. For example, I named my workspace “testinstance.” Finally, select “review + create.”
3. Create a Storage Account
Search for “storage accounts” in the search bar and select “create.” Then, choose the existing resource group. Add your unique storage account name. For example, I added “rahulstorage9.” Then, select “standard” for “performance” and “redundancy” for “locally-redundant storage (LRS)”.
Next, set “default” as the configuration for the tabs “Advance,” “Networking,” “Data protection,” “Encryption,” and “Tags.”
Finally, select “Review + create.”
4. Enabling Microsoft Sentinel
Search for “Microsoft Sentinel” and select it and the workspace you created before, such as the “testinstance” I created. Then, find “data connectors” in the left portal menu.
Next, search for the “Azure Storage Account,” and open the “connector” page. Inside the Azure Storage Account, go to the “diagnostic setting” on the left menu. Then, select “+ Add diagnostic setting” and type a diagnostic setting name. Next, under the “destination” details, choose “send to log analytics workspace.”
Select the log analytics as a “testinstance (eastus).” And under “metrics,” check the box for “transaction” and click “save.”
5. Hunting in Sentinel
In the left portal menu in Sentinel, find and choose “hunting.” Then click on “+ New Query” and enter the following into the values:
- Add “Monitor Azure Storage Account” into “name.”
- In “custom query,” add the query below:
AzureActivity
| where Properties has “Microsoft.Storage/storageAccounts/listKeys/action”
| extend WhoDidIt = Caller, StorageAccountName = tostring(parse_json(Properties).resource)
| project WhoDidIt, StorageAccountName, ResourceGroup, _ResourceId, CallerIpAddress, EventSubmissionTimestamp
Then, click on “Create.”
6. Deploying the Playbook to Post a Message on Microsoft Teams
You’ll create a playbook using a Microsoft template by clicking here. Then, enter the name of your playbook. For example, I named mine “PostMessageTeams-OnAlert.” Next, click “review + create.”
Within the Microsoft Sentinel, navigate to “Hunting” and “Open live stream.” Create an analytics rule in the “General” tab and enter the “Name.” Finally, choose “medium” as the severity.
In the “Set rule logic” tab, you’ll add the entity mapping as you see below:
a) Account > Name > WhoDidIt
b) IP > Address > CallerIPAddress
c) Azure resource > ResourceId > _ResourceId
- In the “Incident settings” tab, enable the “Alert grouping” option.
- In the “Automated response” tab, select “PostMessageTeams” as an “Alert automation playbook.”
- Click “Review + create.”